Saturday, January 28, 2017

Celebrate Blogging Link-up Party #22


WELCOME!
I am so excited to have you join me again on my new blog!
I was getting frustrated with my previous web host and I am finding Blogger to be a nice fit. 
I love how easy and quick it is to create and blog post. It went from taking a couple hours to less than 20 minutes...depending on my post.

Anyway, I am happy to have you here and I hope to host this link-up weekly again.
If you are joining us from our Facebook group...thank you for being a part of the group!
If not, please feel free to join our group: CELEBRATE BLOGGING FACEBOOK GROUP

We have daily threads, connect with other bloggers, leave social media links, leave a pin link, give/get advice from other bloggers, leave a link to your own link-up and much more from our group!


Tuesday, January 24, 2017

Winter Birds Preschool Unit


 Everyday when we head inside from my van, my preschoolers always notice the birds singing. We have a conversation about how the birds are singing for them and how pretty birds are. We live in New England so we have mostly finches, blue jays and cardinals in winter time. I thought the girls would really enjoy a week of winter birds!


I spent the weekend making these felt birds in different colors...adding a feather to each one.


Then I created this worksheet on canva.com to help them count and check them off as they went.


I hid the birds around the living room...gave them binoculars for fun and let them go look for them. 
They enjoyed it and took turns hiding them for each other.


For our sensory activity, we made a birds nest.
We used:
*BROWN YARN
*STICKS
*POPSICLE STICKS
*FELT SCRAP PIECES
*FEATHERS
*PIPE CLEANER (A 'WORM')
*PLASTIC EASTER EGGS
*BIRD DOLLS

The bird dolls are from Bass Pro Shop and they make bird sounds when you squeeze them!
I mixed all the supplies up into a mess and then asked the girls to create a nice, round, cozy nest for their eggs. I showed them some pictures of nests as example to give them an idea of what they needed to do.


Our craft for this unit was painting a birdhouse.


Their pretty birdhouses!

We also went over bird names, sang some songs about birds, played 'Duck, Duck, Goose', watched some educational bird videos on YouTube Kids and read some bird books!

Another fun idea to add to this unit is a nature walk.
Here is a free winter nature walk scavenger hunt print:
WINTER NATURE WALK SCAVENGER HUNT
(RIGHT CLICK AND SAVE)

Thursday, January 19, 2017

White Crayon Reveal Watercolor Mittens


This week we finish up our winter theme for our home-school preschool. Next week we start our hibernating animals theme and go into our Valentine theme for February. We had done plenty of snowflake and snowman crafts, so I wanted to do something else. Both of my preschool girls love to paint. So I went with the WHITE CRAYON REVEAL WATERCOLOR MITTENS. This craft is fun, because I don't tell the girls what I drew on their paper. I like to see them slowly paint and discover the drawing...so fun!


HOW-TO: Take a white piece of paper and use a white crayon to draw mittens. Then use watercolors to reveal your mittens. Allow to dry and cut out the mittens. Hole-punch the top of the mittens and add to string.

So fun when the girls see whats hiding on their paper!


So cute once they are cut out and strung on!!


TA-DA!

Bohemian Style Bedroom Make-over


My oldest daughter wanted to make-over her bedroom. She is obsessed with all things bohemian...(and so is her mom, so I don't mind!). So we went on Pinterest to start getting ideas. We looked at items we had at home and some diy projects we could do. It was the perfect thing for some mother-daughter bonding...as well as creating a pretty room!


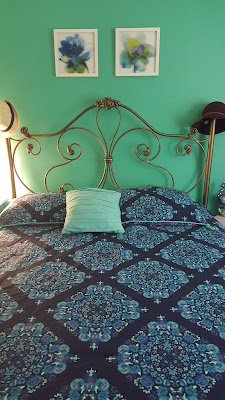
We decided to start with paint color and bedspread choices. We headed over to Home Depot and looked at paint colors. I wanted to let my 12 year old pick the color first to see what she wanted. Turns out she has great taste because this was the first color she picked! I love it...it's from BEHR and it's called 'TROPICAL TRAIL P320-3'. We only painted one wall. It is a trick I use in small rooms to make them appear bigger. The bedspread I got from Target.com. Made by a company called 'Boho Boutique'. We also got the two flower pictures from Target as well, but in-store.


We also grabbed the purple night stand, folding chair and wooden arrow sign at Target. She loves this chair...it's a great spot to curl and read a book. The wooden arrow sign also has hooks on it for hanging things. Currently it has diy doily dream-catchers hanging from it that we made later on. From the ceiling we have a firefly chandelier garden lights. It's cool, because it doubles as her night light! 


For the nightstand, a porcelain peacock with all the right colors...her rhinestone mirror and comb from Disney World and a blue/white china coaster.


The dark wood cube shelves and pretty cubes are also from Target. We used these to put her art supplies and toys.


Who doesn't love a little teal furniture to brighten up the room?! (Also from...you guessed it...Target.) We put her knick-knacks in here and her jewelry box on top.


A place to hang her archery bag.


Her dream-catcher she made...


Hope you enjoyed this make-over as much as we did!


Wednesday, January 18, 2017

Homemade Baked Donuts Recipe


Today we had a snow day! The whole family was home, including daddy. We got about 6 inches of heavy snow throughout the night. I decided to make it extra cozy by making some homemade goodies. 

I have always wanted to make homemade donuts. When I was younger I would read 'Farmer Boy' by Laura Ingalls and I always loved how his mom had the house full of good smells and good food. Every chapter is filled with delicious foods his mom was making. I sometimes get in the mood to read it before bed...especially on cold nights!


My oldest help me bake...it was so nice to spend the day with her in the kitchen!

INGREDIENTS
For the donuts:
* 1/4 cup unsalted butter (melted and cooled)
* 1/4 cup vegetable oil
* 1 cup granulated sugar
* 2 large eggs 
* 1 teaspoon vanilla extract
* 2 2/3 cups all-purpose flour 
* 1 1/2 teaspoons baking powder
* 1/2 teaspoon salt 
* 1/4 teaspoon baking soda
* 1/8 teaspoon ground nutmeg
* 1 cup buttermilk

For the glaze:
* 2 cups confectioners' sugar
* 2-3 tablespoons milk
*1 teaspoon vanilla extract

INSTRUCTIONS
1. Preheat the oven to 425 degrees F. Lightly spray a 6-cavity donut pan with non-stick cooking pan.

2. In a large bowl, whisk the butter, oil and sugar together until combined. Add the eggs and vanilla...whisk until well combined.

3. In a separate bowl, add the flour, baking powder, salt, baking soda and nutmeg. Stir with a whisk. Stir in half the flour mixture into the wet ingredients...followed by the buttermilk and then the remaining flour. Stir until combined...the batter will be thick.

4. Transfer the batter into a disposable piping bag or zip-lock bag with a small corner cut off. Pipe the batter into the prepared pan, filling each 2/3 full. 

5. Bake for 7-9 minutes or until donuts spring back when pressed lightly. Set the donuts on a wire rack to cool for 5 minutes. Meanwhile make the glaze.

To make the glaze:
1. In a medium bowl, combine the confectioners' sugar, milk and vanilla. Stir until well combined, adding more milk if needed.

2. Dip the donuts while they are still warm into the glaze and set them on a wire rack to set.
Optional: In a small bowl, combine 2 tablespoons of granulated sugar and a 1/2 teaspoon of cinnamon. Stir to combine and sprinkle on top of the glazed donuts.

*Best served warm. Will keep airtight at room temperature for up to 4 days.

Making the vanilla glaze...

 Fresh from the oven!

Dipping in the vanilla glaze.

Apple turnover recipe in another blog post...

Looks like they enjoyed them!


Redecorating the Playroom: Tent-bed & Glass Milk Jar Lights


This past Monday I finally had a chance to clean the kids playroom. For me, that always means rearranging, reorganizing and moving stuff around. (I can't help it...it's what I do...lol.) We live in a two bedroom apartment with three kids. So my hubby and I decided to give the three kids the master bedroom, because well...where else are they going to fit?! The two older kids share a bunk- bed and my three year old has been sleeping in her crib. So I decided that it was time for her to upgrade to a toddler bed.
(before picture)

This is how the room looked before. I wanted to get rid of the shelves of toys to make more room to play. So came up with the idea to reorganize my closet so that the kids shared a clothes closet with us. That way their closet was free for all the toy shelves. 

(Our closet with everyone's clothes combined.)

We used two long metal racks on top. The very top rack I used for my purses and scarves. The second metal rack I bought deep buckets to hold each person's shoes. (Of course mama had three buckets for her shoes...lol.) Then we put two 9-cube shelves side by side. Each person had one cube for pants, one cube for shirts and one cube for underwear and socks. We also had a cube for dresses, sweaters, etc. I loved this, especially when putting the laundry away! Everything in one closet!!

(The kids closet all organized!)

For the kids closet we had one side with 'Closet-Maid' shelves and the other side with two 'Closet-Maid' 9-cube shelves on top of each other. We filled the cubes with all their books, puzzles and electronic toys. The shelves were filled with the rest of the toys. 

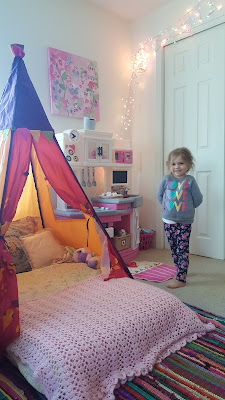
Now that the room was open and clean...I got to work taking the crib apart. I took the crib out leaving the mattress and put the tent together. This tent is from Target and I love the bright colors. It has a lantern inside that has stars shining in multi-colors when you turn it on. 
(Her tent-bed using her mattress from her crib.)


My next idea was to give the room some more lighting. I wanted it to be fun and almost magical. One wall in the room is painted as a rainbow. I had some Christmas lights that were rainbow colored...the wheels in my head started turning. Then I came up with the idea to hang old-fashioned glass milk jars on the wall and fill them with the Christmas lights to almost resemble a lantern!


I love these ideas, because they helped me save some money AND they are so adorable!

My daughter has been spending a lot more time in her room since them. She also successfully slept in her tent-bed all week. The playroom looks so charming...
What do you think?!